In this article, we'll describe how to deploy an L2TP/IPSec Remote Access VPN (Virtual Private Network) on a Ubiquiti EdgeRouter 4, using RADIUS (Remote Authentication Dial-In User Service) for central user authentication through Windows Network Policy Services, and Duo Security Multifactor Authentication (MFA).
What can I use it for?
Enterprise users who are on business trips or working from home can use a Virtual Private Network to connect their devices to company resources, such as file servers and enterprise applications (e.g., CRM, ERP). In this scenario, we will utilize the Layer Two Tunneling Protocol (L2TP) over Internet Protocol Security (IPSec) encryption to offer VPN services to our users. Since L2TP doesn't have integrated encryption, the data transmitted between users' devices and the VPN server will be encrypted with a 256-bit encryption key. We will use the Network Policy Server (NPS) service in Windows Server 2019 to authenticate users in our on-premises Active Directory.
As an extra security layer, we will utilize Duo Security MFA push notifications on smartphones to approve login requests.
How does it work?
- The user (who exists in the Active Directory and has previously configured the Duo Mobile app on a smartphone) initiates a VPN login request from a device (e.g., PC, tablet) to the EdgeRouter 4.
- The EdgeRouter 4 (acting as the VPN server) forwards the primary login request to the Duo Security Authentication Proxy (deployed on the TS1 server).
- The Duo Security Proxy sends the pre-authentication request to the Network Policy Server (also deployed on the TS1 server).
- The Network Policy Server (NPS) authenticates the user in the Active Directory.
- If the user provides a valid username and password, the NPS server sends a pre-authentication response back to the Duo Security Authentication Proxy.
- The Duo Security Authentication Proxy processes the pre-authentication response and sends a secondary authentication request to the Duo Security Service (operated by Cisco).
- The Duo Security Service forwards the secondary request as an MFA request to the user's Duo Mobile app, displaying it as a push notification on the user's smartphone.
- The user approves the secondary authentication request on the Duo Mobile app.
- The Duo Mobile app forwards the secondary authentication response to the Duo Security Service.
- The Duo Security Service forwards the secondary authentication response back to the Duo Security Authentication Proxy.
- The Duo Security Authentication Proxy forwards the secondary authentication response to the Network Policy Server (NPS).
- The NPS processes the secondary authentication response, authorizes the user to connect through the VPN, and sends an authorization response to the Duo Security Authentication Proxy.
- The Duo Security Authentication Proxy forwards the authorization response to the EdgeRouter 4.
- The EdgeRouter 4 processes the authorization response and establishes the VPN connection with the user's device.
We won't detail the installation of different server roles on the Windows Server operating system, as it is straightforward using Windows Server's built-in Server Manager tool.
Our network has the following components installed:
- Ubiquity EdgeRouter 4: router operates as L2TP/IPSec VPN server and acts as a RADIUS client. LAN IP: 192.168.10.1
- Hyper-V virtual machines:
- Microsoft Active Directory: We have two virtual machines (hostnames: DC1: 192.168.10.2 and DC2: 192.168.10.3) with the Active Directory Domain Services role installed. We created a global security group called g-HOME VPNUsers, whose members are allowed to connect through the VPN.
- Network Policy Server (NPS): The NPS role is installed on a separate virtual machine (hostname: TS1, IP: 192.168.10.11).
Installing and configuring Network Policy Server (NPS) role
The NPS server acts as a RADIUS server and is responsible for processing RADIUS authentication requests from the EdgeRouter, which acts as a RADIUS client. The RADIUS service is part of the NPS role, which will be installed on a separate VM (hostname: TS1).
- Open Server Manager and click Add roles and features
- Choose and install Network Policy and Access Services Tools
Configuring NPS
Once the Network Policy and Access Services Tool is installed, we can configure the Network Policy Server. In Server Manager, click Manage > Network Policy Server.
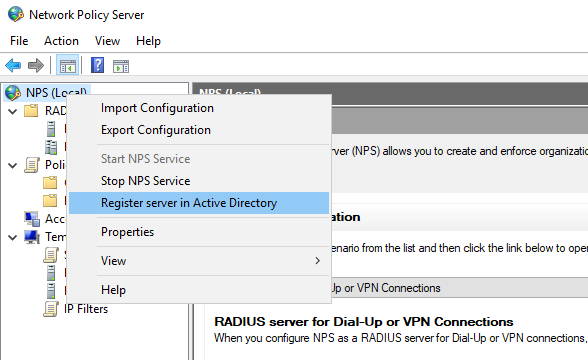
As a first step, we need to register our NPS server in Active Directory as a server authorized to process authentication requests:
- Right-click NPS (Local) and choose Register server in Active Directory.
Creating new Connection Request Policy
-
Add the RADIUS client:
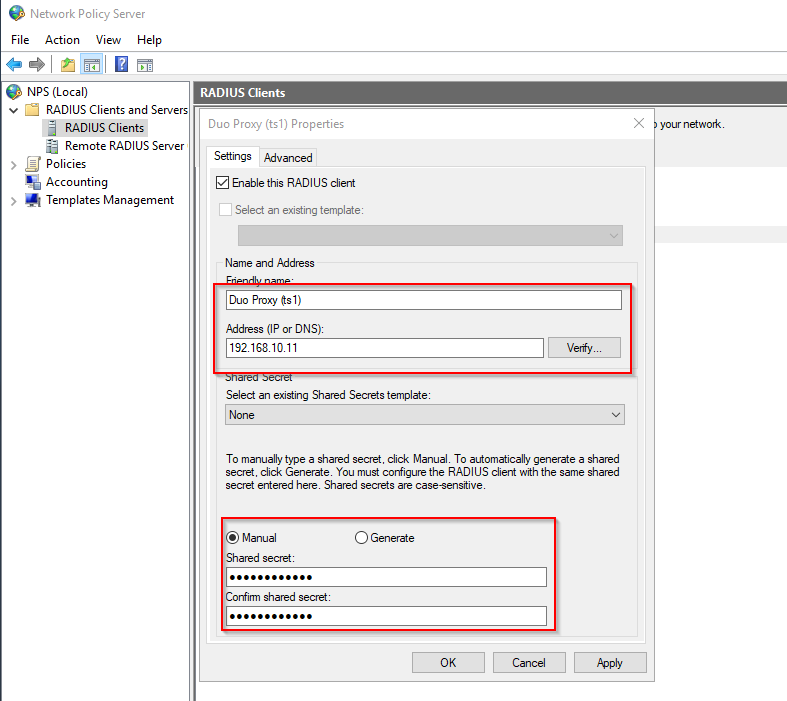
- Right-click RADIUS Clients and Servers > RADIUS Clients and click New.
- Enter a Friendly name (e.g., Duo Proxy (ts1)), the IP address of the RADIUS client (the Duo Proxy installed on the same server (TS1) with the IP address 192.168.10.11), and the shared secret. This shared secret must be the same on both the NPS server (RADIUS server) and the Duo Security Authentication Proxy (the RADIUS client).
-
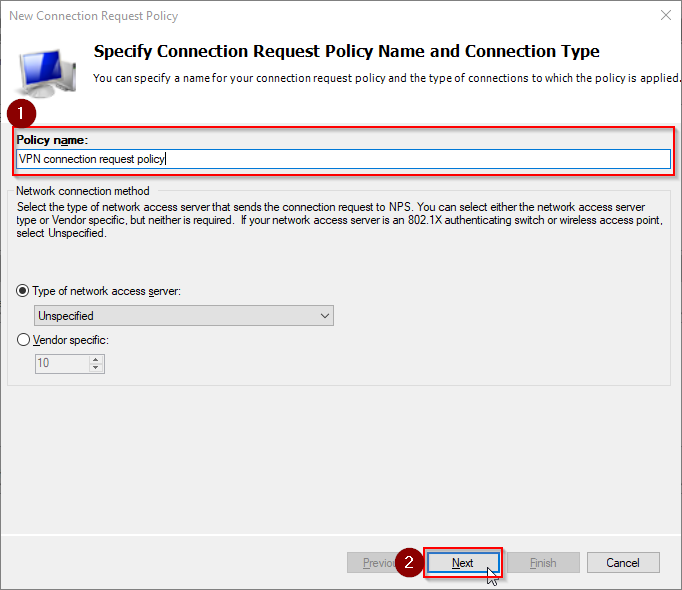
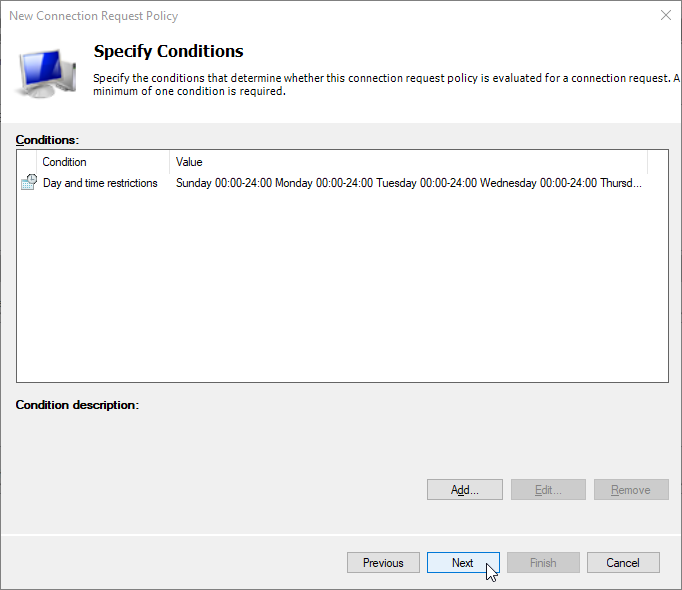
At the next step, we define, which users and when are allowed to connect to the VPN server. Right-click Policies > Connection Request Policies and click New. Type the Policy name and click Next.
-
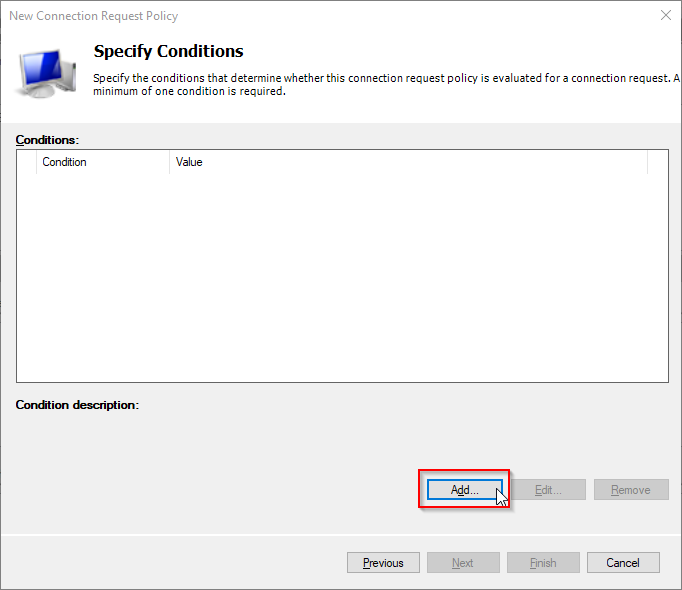
Click Add button to create a new condition.
-
In the condition list, click Day and Time Restrictions and click Add button

-
We want to allow our users authenticating every day at any time. Choose the option Permitted and click OK.

-
Click Next
-
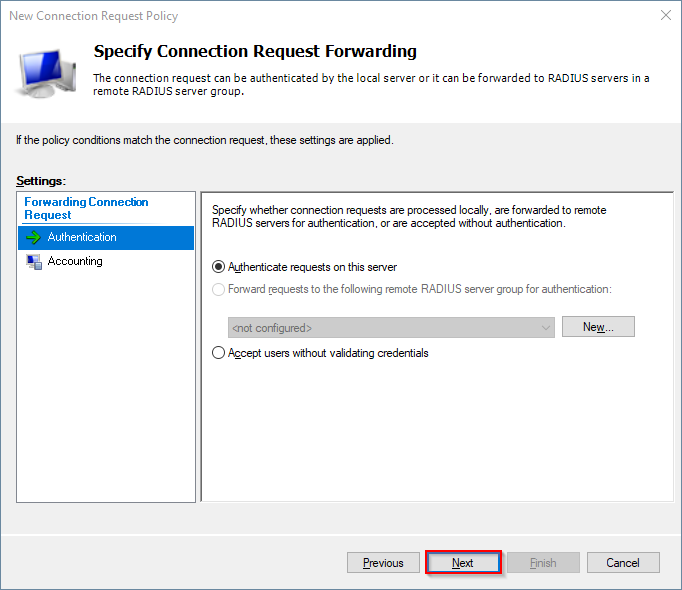
Leave everything unchanged and click Next.
-
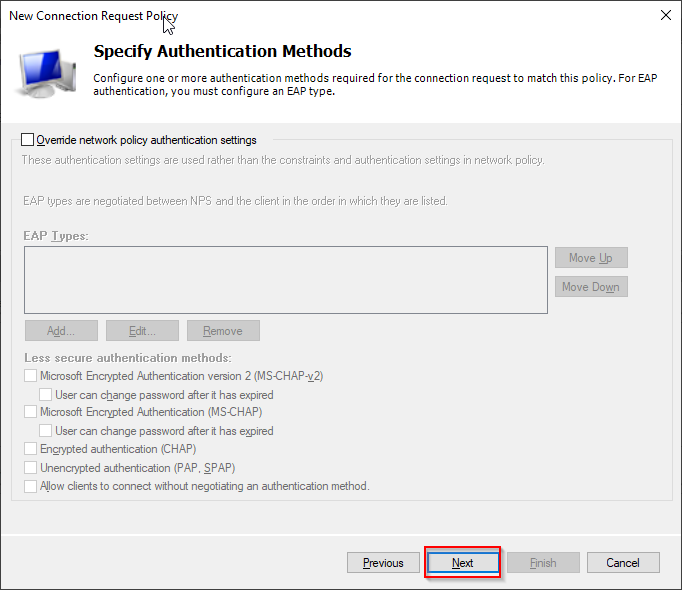
Leave everything unchanged and click Next.
-
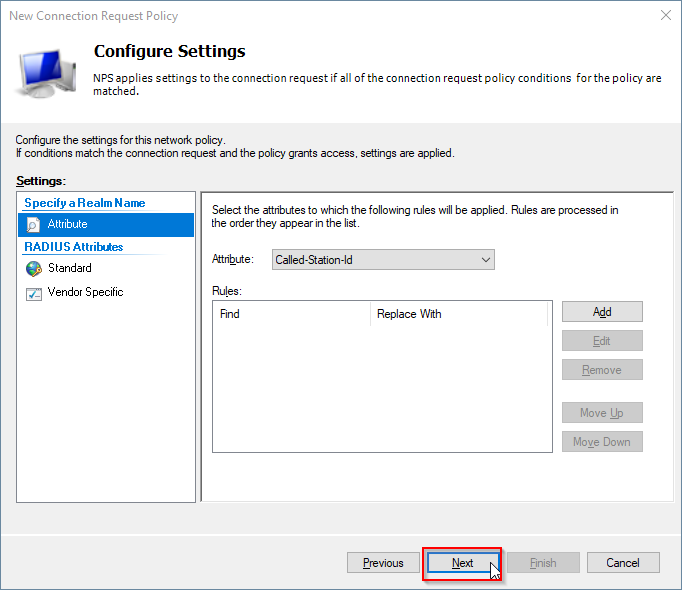
Leave everything unchanged and click Next.
-
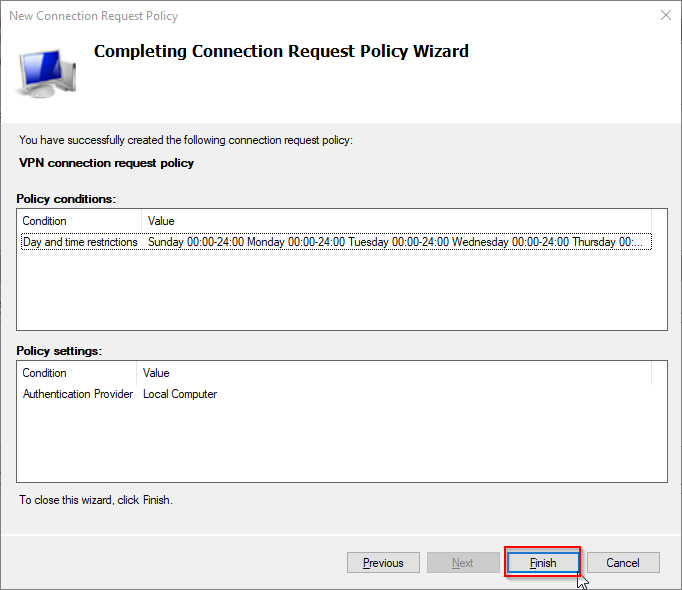
Click Finish.
Creating new Network Policy
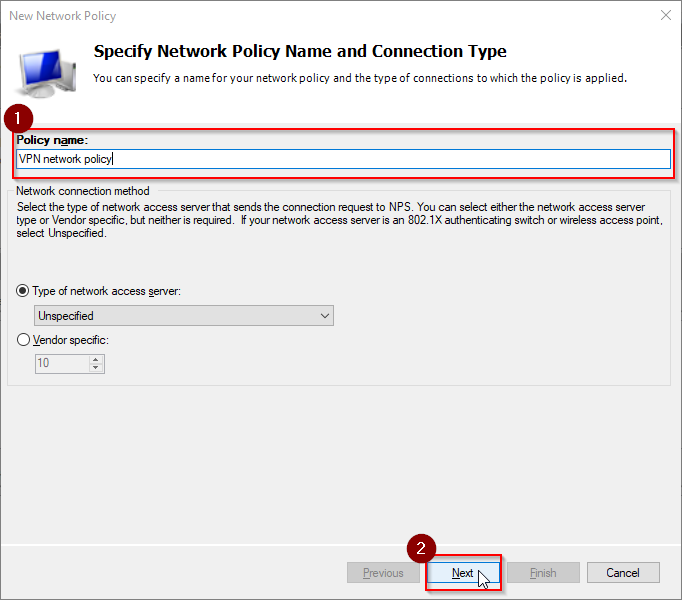
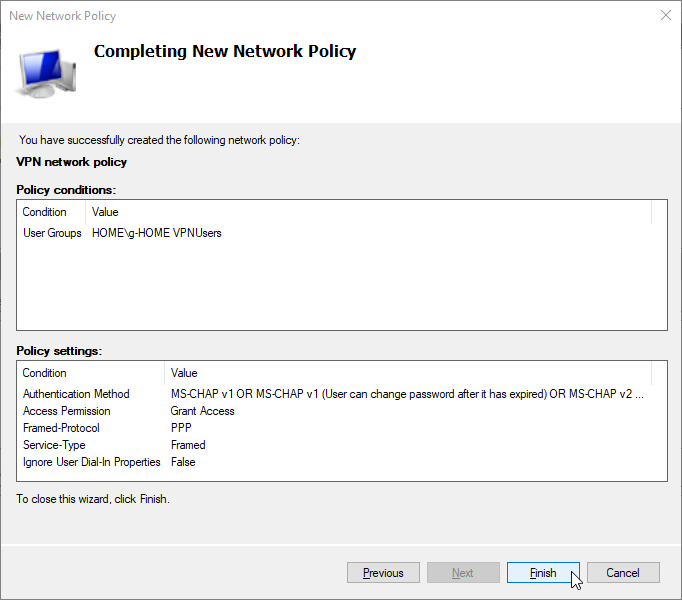
- Right-click NPS (Local) > Policies > Network Policies and click New. Type the the name of the new network policy and click Next.
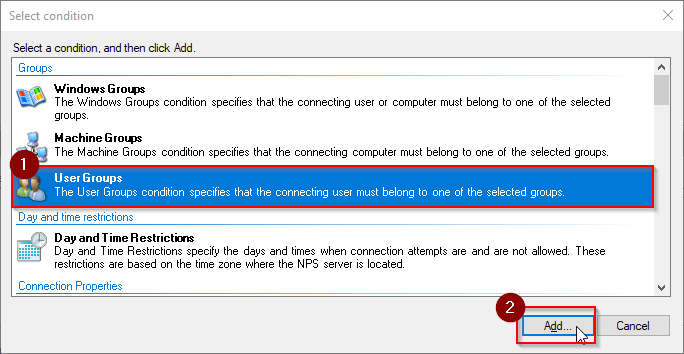
- We define one policy condition, namely the user group (g-HOME VPNUsers) that is allowed to connect using VPN. Select User Group from the condition list, and click Add... button.
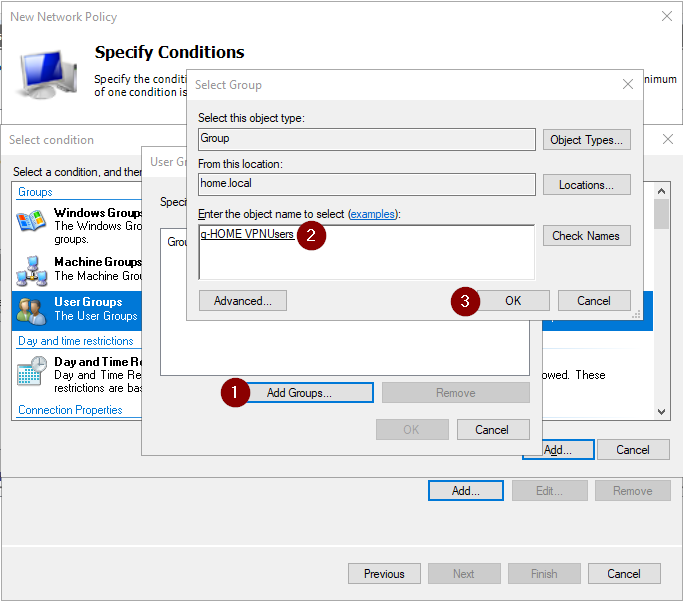
- Add the user group you want to allow connecting
- Click Next
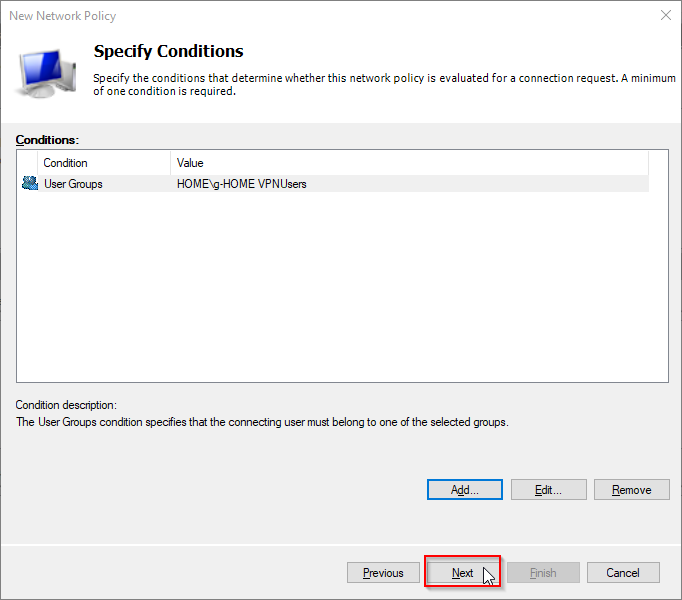
- Leave everthing unchanged and click Next

- Remove tick from Microsoft Encrypted Authentication (MS-CHAP). This authentication methode utilizes a less secure and vulnerable encryption method, so we won't allow it. Click Next.
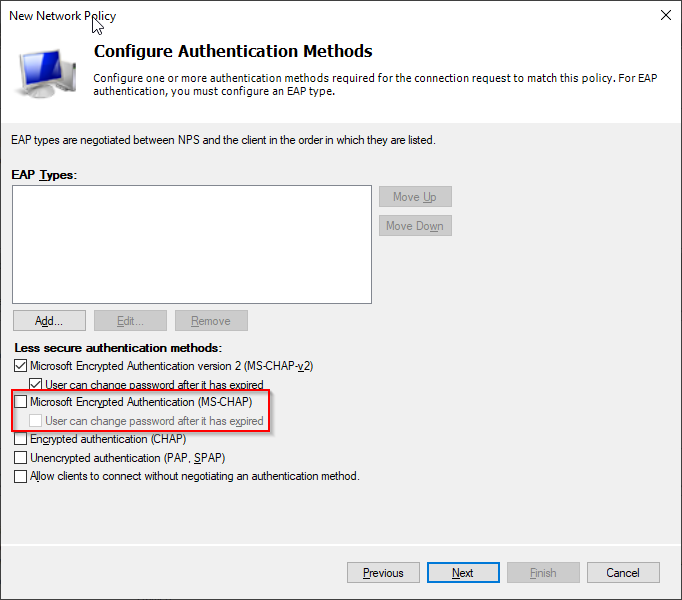
- Leave everthing unchanged and click Next
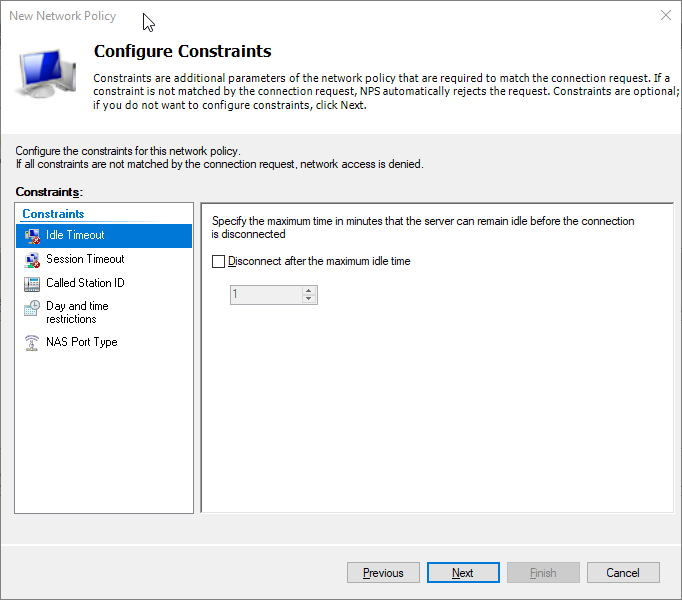
- Leave everthing unchanged and click Next
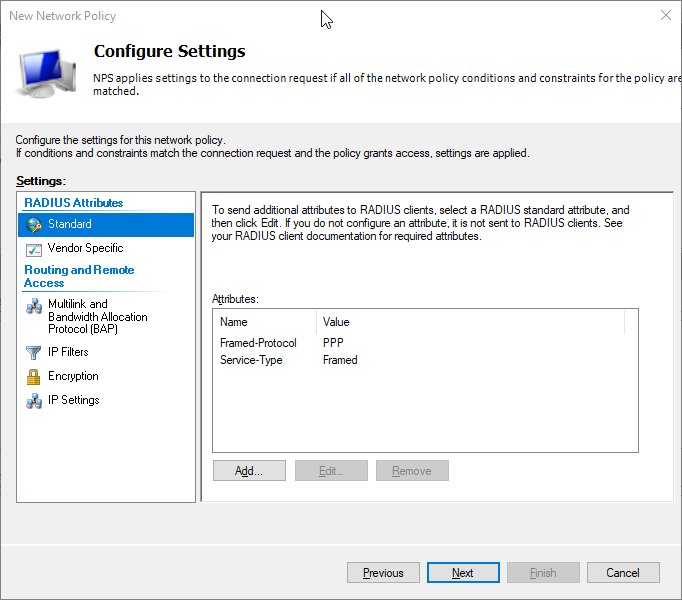
- Click Finish
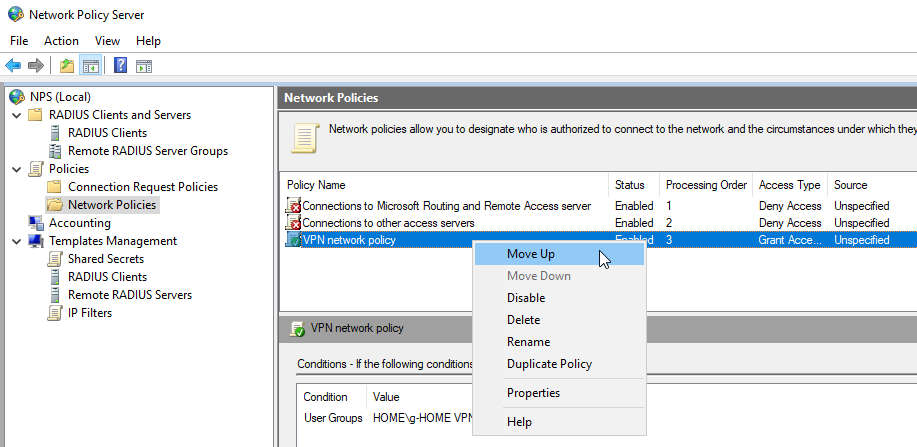
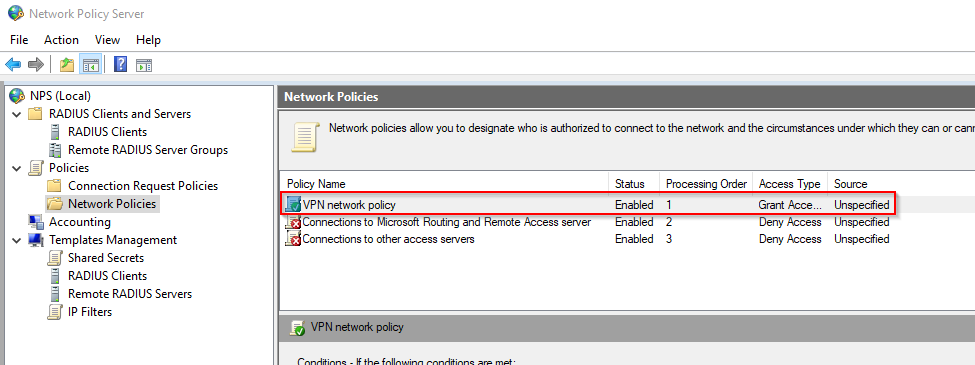
- Move the newly create network policy (VPN Network Policy) to the to of the network policy list in order to process it before any others. Right-click the policy name and choose Move up from the menu.
Enabling Remote Access VPN on Ubiquity EdgeRouter 4
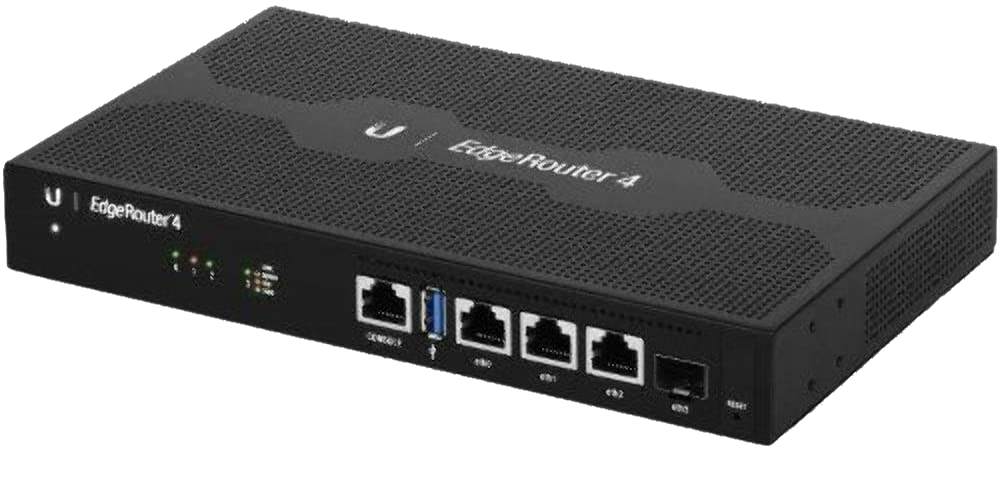
Describing all functions of Ubiquiti EdgeRouter 4 is beyond the scope of this aricle. EdgeRouter 4 has 4 routed ports: 3 pcs. 1Gbps Ethernet and 1 pc. SFP (Small Form-Factor Pluggable) port, that is able to connect to 10Gbps network via fiber cable.
The Ubiquiti EdgeRouter 4 has built-in L2TP/IPSec VPN server, that can be configured to act as a RADIUS client so that we can authenticate users from the Active Directory.
In order for remote users be able to connect to the L2TP/IPSec VPN server, we need to accomplish two main tasks:
- Configuring firewall rules
- Configuring L2TP/IPSec VPN, including user authentication by RADIUS
Configuring firewall rules
The Ubiquiti EdgeRouter 4 has a web-based user interface, where you can configure firewall rules, but you can also use the EdgeRouter's command-line interface to configure these settings very quickly.
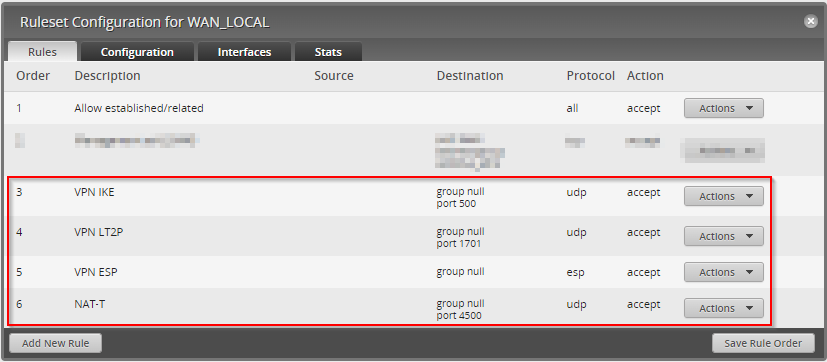
- We create a rule set with the name WAN_LOCAL on the EdgeRouter 4, and assign this rule set to the WAN interface (the eth2 interface in this scenario).
- We create 4 fireall rules in the WAN_LOCAL rules set:
- VPN IKE:
- Protocol: UDP
- Port number: 500
- Action: accept
- VPN L2TP:
- Protocol: UDP
- Port number: 1701
- Action: accept
- VPN ESP:
- Protocol: ESP
- Action: accept
- NAT-T:
- Protocol: UDP
- Port number: 4500
- Action: accept
- VPN IKE:
When you are done, you will see similar picture on the Ubiquiti EdgeRouter 4 web-based firewall ruleset configuration page:
For more details (including command line interface (CLI) commands, see Ubiquiti reference: EdgeRouter - L2TP IPsec VPN Server – Ubiquiti Support and Help Center
VPN server and RADIUS client on EdgeRouter 4
The EdgeRouter 4 operates as a VPN server, utilizing Layer 2 Tunneling Protocol with Internet Protocol Security, which uses a 256-bit length encryption key to encrypt the data transmitted between the VPN server and users' the endpoints. The VPN server and the VPN clients use the pre-shared key methode for pre-authentication.
In this scenario, user authentication is accomplished in the Active Directory.
The VPN server on the EdgeRouter 4 forwards user authentication requests to its built-in Remote Authentication Dial-In User Service (RADIUS) client. The RADIUS protocol is responsible for forwarding the user authentication request to the Network Policy Server (the RADIUS server), that performs the authentication in the Active Directory. If the user exists in the Active Directory and is authorized for remote dial-in (VPN), the VPN connection can be established.
The Duo Security Authentication Proxy and the Network Policy Server (NPS) has been installed on the TS1 server. The standard RADIUS UDP port number is 1812. In this scenario, the NPS (RADIUS) server role and the Duo Security Authentication Proxy service is running on the same server (i.e. TS1), the 2 services cannot listen on the same port (i.e. 1812). Therefore, we configure the the EdgeRouter 4 sendig RADIUS requests from port 18120 toward the Duo Security Authentication Proxy, which also listens on UDP port 18120 on TS1. And then, the Duo Security Authentication Proxy forwards the RADIUS requests to the NPS (also on TS1), which listens on the standard RADIUS port 1812.
Configuration of L2TP/IPSec remote access VPN with RADIUS authentication on EdgeRouter 4
The L2TP/IPSec remote access VPN is a widely used remote access VPN protocol, and it is supported on the most popular desktop and mobile operating systems natively (including Windows, MacOS, Linux, iOS and Android), without using any third-party software.
The Layer 2 Tunneling Protocol (L2TP) itself doesn't encrypt the data, it is performed by the Internet Protocol Security, which encrypts the L2TP-encapsulated data packets with a very strong AES-256 encryption algorithm.
In this scenario, we configure the L2TP/IPSec VPN server on EdgeRouter 4 using the command line interface. Open an ssh session or use the built-in CLI tool on the EdgeRouter's web interface to issue the commands.
The VPN server listens on the EdgeRouter's will be configured with the following parameters:
- Outside address: it has to be our WAN interface' IP address. For privacy reasons, we don't publish any public IP address here.
- IPSec mode: pre-shared secret
- IPSec protocol utilizes pre-shared key OurTopSecretPreSharedKey1
- Authentication mode: RADIUS
- The RADIUS server (where the Duo Proxy Authentication Proxy has been deployed, i.e. TS1) IP address is 192.168.10.11
- The RADIUS shared secret is RADIUS-TopSecret
- RADIUS server port: 18120
- VPN client IP address pool (we allow 50 clients to connect): 172.20.0.1 - 172.20.0.49
- DNS servers: 192.168.10.2 (DC1) and 192.168.10.3 (DC2)
set vpn l2tp remote-access outside-address <outside-address>
set vpn l2tp remote-access ipsec-settings authentication mode pre-shared-secret
set vpn l2tp remote-access ipsec-settings authentication pre-shared-secret OurTopSecretPreSharedKey1
set vpn l2tp remote-access authentication mode radius
set vpn l2tp remote-access authentication radius-server 192.168.10.11 key RADIUS-TopSecret
set vpn l2tp remote-access authentication radius-server 192.168.10.11 port 18120
set vpn l2tp remote-access client-ip-pool start 172.20.0.1
set vpn l2tp remote-access client-ip-pool stop 172.20.0.49
set vpn l2tp remote-access dns-servers server-1 192.168.10.2
set vpn l2tp remote-access dns-servers server-2 192.168.10.3
commit ; save
Deployment of Duo Security Authentication Proxy
Duo Security Authentication Proxy from Cisco provides an extra security layer in form of 2-Factor Authentication. Users connecting to the enterprise network using L2TP/IPSec remote access VPN have to approve their login attempts with the Duo Mobile mobile app. The Duo Mobile app can be downloaded on iOS devices from the Apple App Store: Duo Mobile on the App Store (apple.com) and on Android devices from Google Play: Duo Mobile – Apps on Google Play
In this scenario, we deploy Duo Security Authentication Proxy on the TS1 server (192.168.10.11).
The Duo Security Authentication Proxy can be downloaded from the Duo Software Checksums and Downloads | Duo Security website.
Signing up for Duo Security and registering users
To use Cisco's Duo Security, you have to sign up for the Duo Security service via https://signup.duo.com/. Cisco allows to register an account, and join up to 10 users for using Duo Security Tow-Factor Authentication (2FA) for free. In need of using advanced features, or if your business has more than 10 users using Duo Security, you will need to register for a paid plan for a very affordable price, starting from as low as $3 / user / month (February 2022 price).
Registering the RADIUS application in Duo Security
After we have signed up to Duo Security, we have to add our Duo Security Authentication Proxy as a RADIUS application in the Duo Security administration.
- Click Application > Protect an Application on the left-pane menu.
- In the search field, type "radius" and click the Protect button
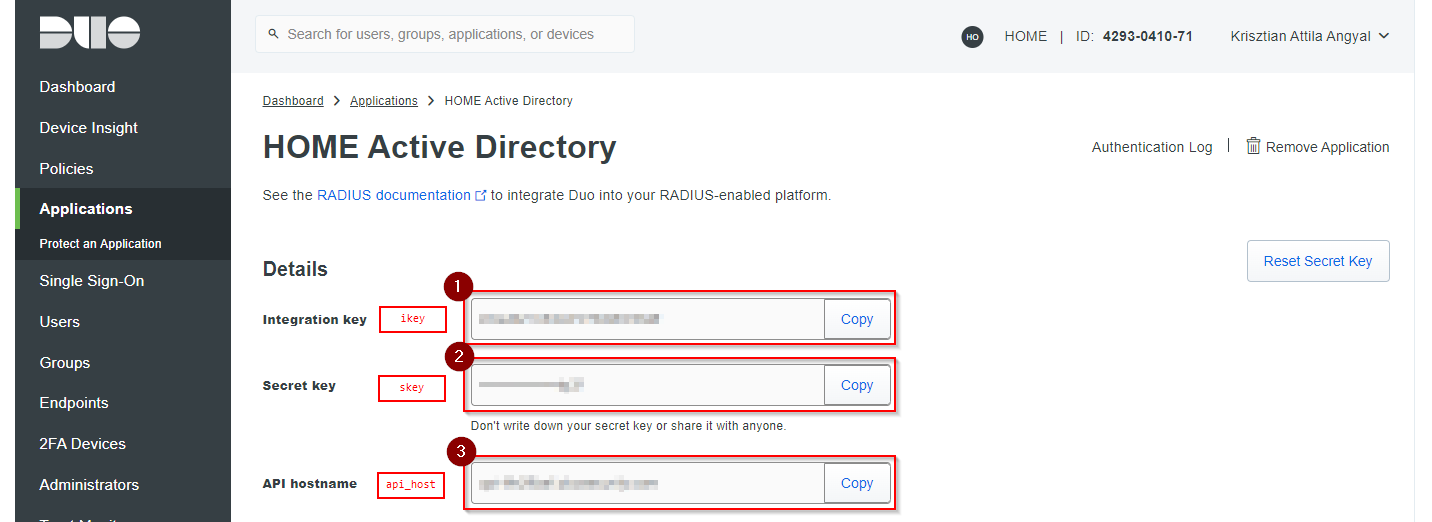
- After adding the RADIUS application you will be provided an Integration key, a Secret key, and an API hostname. These keys will have to be registered in the Duo Security Authentication Proxy configuration file (see next section).

Configuring Duo Security Authentication Proxy (authproxy.cfg)
After the Duo Security Authentication Proxy has been downloaded, we will configure it to send authentication requests to NPS server (also deployed on TS1).
The Duo Security Authentication Proxy has the configuration file authproxy.cfg, located in the C:\Program Files\Duo Security Authentication Proxy\conf\ directory. This file contains some pre-configured options. The configuration parameters and the [ad_client] section descriptor have to be commented out using the ; sign.
The [radius_server_auto] section provides the Duo Security Authentication Proxy information about the Duo Security RADIUS application. From the Duo Security Authentication Proxy's perspective, it is the RADIUS server.
The [radius_client] section contains configuration options about the NPS server (RADIUS server). From the Duo Security Authentication Proxy's perspective, it is the RADIUS client.
[radius_server_auto]
ikey=XXXXXXXXXXXXXXXXXXXX
skey=YYYYYYYYYYYYYYYYYYYYYYYYYYYYYYYYYYYYYYYY
api_host=api-ZZZZZZZZ.duosecurity.com
radius_ip_1=192.168.10.1
radius_secret_1=RADIUS-TopSecret
failmode=safe
client=radius_client
port=18120

[radius_client]
host=192.168.1.11
secret=Radius.Kulcs
pass_through_all=true
port=1812
The following parameters have been provided in the RADIUS application in the Duo Security administration previously.
- ikey: the Integration key
- skey: the Security key
- api_host: the API hostname
The following parameters provide the Duo Security Authentication Proxy information about the RADIUS client (in this setup, the RADIUS client is the EdgeRouter 4):
- radius_ip_1=192.168.10.1 (the IP address of the EdgeRouter's LAN interface)
- radius_secret_1=RADIUS-TopSecret : the pre-shared secret that we previously configured on the EdgeRouter 4
- client=radius_client : the Duo Security application
- port=18120 : the port number that the Duo Security Authentication Proxy uses to communicate with the EdgeRouter 4. This port number has to be the same in the EdgeRouter 4 configuration
Save the C:\Program Files\Duo Security Authentication Proxy\conf\authproxy.cfg file, and start the Duo Sercurity Authentication Proxy Service either with the Windows' Service control management console or with net start duoauthproxy command from a command line.
Configuring Duo Mobile app
After you have registered for Duo Security, you will have to add your users (with a valid e-mail address) and send them an invitation e-mail.
- Users have to download the Duo Mobile, and click the invitation link (sent by e-mail) on a computer. The invitation link will provide a QR code.
- Open Duo Mobile app, and add the user account by scanning the QR code provided in step 1.
Describing the sign-up process is beyond the scope of this article, so we assume that you are familiar with administration of users and devices in Duo Security – Google and Youtube are your friends ;-)
